ラジオボタンの見た目を
ボタンコントロールのようにします。
AppearanceプロパティーにButtonを設定します。
radioButton1.Appearance = Appearance.Button;
ラジオボタンの見た目を
ボタンコントロールのようにします。
AppearanceプロパティーにButtonを設定します。
radioButton1.Appearance = Appearance.Button;
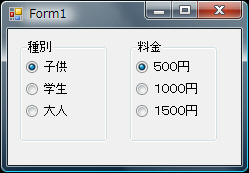
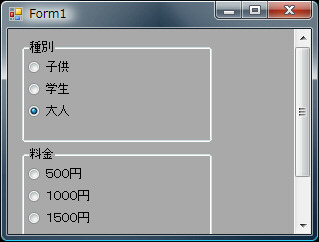
複数ある選択肢の中から1つだけを選択する場合は
ラジオボタン(RadioButton)コントロールを使います。
使い方は、
フォーム上に選択肢の数だけ
RadioButtonコントロールを配置します。
選択肢の名称はTextプロパティーで設定します。
なお、現在選択されている選択肢は
各RadioButtonコントロールの
Checkedプロパティーの真偽値で判断可能です。
Checkedプロパティーの値が
trueであれば選択状態。
falseであれば非選択状態です。
(デザイン時にデフォルトの選択肢を選択状態にするとよいです)
以下は、3つの選択肢の中で
現在選択されている項目の名称を表示するサンプルです。
【補足】
	チェックボックスに対して
	ラジオボタンの用途は
	複数の選択肢の中から単一項目を選択することなので
	Checkedプロパティーがtrueとなるコントロールは
	グループ内(この場合はフォーム内)で
	1つのコントロールのみとなります。

	同じフォーム内に
	ラジオボタンの選択グループを複数作成したい場合は
	ラジオボタンの集まりをグループボックスコントロールで囲みます。
// ラジオボタン1がチェックされているか?
if (radioButton1.Checked)
    MessageBox.Show( radioButton1.Text );

// ラジオボタン2がチェックされているか?
if (radioButton2.Checked)
    MessageBox.Show( radioButton2.Text );

// ラジオボタン3がチェックされているか?
if (radioButton3.Checked)
    MessageBox.Show( radioButton3.Text );
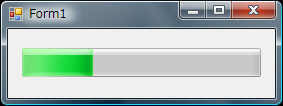
ProgressBarコントロールを使うと
処理の進捗状況を視覚的に伝えることができます。
例ではダミーでタイマーを設定し
1秒ごとに10%ずつ進捗を進め、100%で処理を停止しています。
なお、イメージはVistaの場合なので
ご利用のOSやテーマによって見た目が異なるかもしれません。
using System;
using System.Collections.Generic;
using System.ComponentModel;
using System.Data;
using System.Drawing;
using System.Text;
using System.Windows.Forms;

namespace WindowsFormsApplication1
{
    public partial class Form1 : Form
    {
        public Form1()
        {
            InitializeComponent();
        }

        private void Form1_Load(object sender, EventArgs e)
        {
            // 最小値
            progressBar1.Minimum = 0;

            // 最大値
            progressBar1.Maximum = 100;

            // 初期値
            progressBar1.Value = 0;

            // プログレスバーを進めるためのタイマー
            timer1.Interval = 1000;
            timer1.Enabled = true;
        }

        private void timer1_Tick(object sender, EventArgs e)
        {
            // 進捗を進める
            progressBar1.Value += 10;

            if (progressBar1.Value >= progressBar1.Maximum)
            {
                timer1.Enabled = false;
                MessageBox.Show("完了!");
            }
        }
    }
}
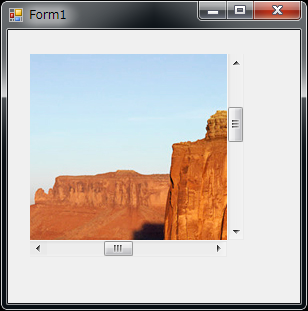
PictureBoxにイメージを表示し、それをスクロールするサンプルです。
PictureBox単体で実現しようとすると難しいので
Panelと組み合わせて実現します。
まず、FormにPanelを配置します。
そのPanelの中にPictureBoxを配置します。
Panelには、Panel内のコントロールが大きく、はみ出る場合に
自動でスクロールバーを表示する便利な AutoScroll プロパティーがあります。
これを利用します。
あとはPictureBox側で、画像を読み込んで
画像の実サイズにPictureBoxをリサイズすれば
勝手にスクロールバーが表示されます。
ここまではよくあるテクニックですが
マウスドラッグでスクロールしたくなると思うので
マウス関連のイベントを利用し、それを実現しています。
クリックしたままマウスドラッグすると
画像を全方向にスクロール可能です。
以下はデザイン時のサンプルです。
FormにPanelを配置し、PictureBoxを中に入れます。
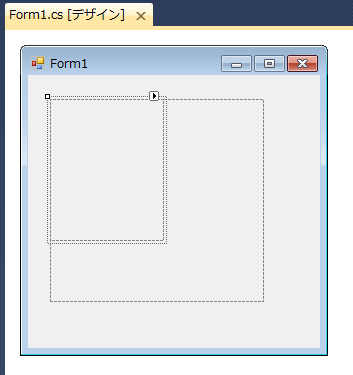
このように表示されます。
using System;
using System.Collections.Generic;
using System.ComponentModel;
using System.Data;
using System.Drawing;
using System.Text;
using System.Windows.Forms;

namespace WindowsFormsApplication1
{
    public partial class Form1 : Form
    {
        bool bDrag = false;
        Point posStart;

        public Form1()
        {
            InitializeComponent();
        }

        private void Form1_Load(object sender, EventArgs e)
        {
            // パネル上のコントロールがはみ出る場合、スクロール可能にする
            panel1.AutoScroll = true;

            // PictureBoxコントロールのサイズを画像の実サイズにする
            pictureBox1.SizeMode = PictureBoxSizeMode.AutoSize;

            // 画像読み込み
            pictureBox1.ImageLocation = @"C:\sample.jpg";
        }

        private void pictureBox1_MouseDown(object sender, MouseEventArgs e)
        {
            // ドラッグ開始
            bDrag = true;
            posStart = e.Location;
        }

        private void pictureBox1_MouseUp(object sender, MouseEventArgs e)
        {
            // ドラッグ終了
            bDrag = false;
        }

        private void pictureBox1_MouseMove(object sender, MouseEventArgs e)
        {
            // ドラッグ中ならスクロール
            if(bDrag)
            {
                Point pos = new Point(
                    e.Location.X - posStart.X,
                    e.Location.Y - posStart.Y);

                panel1.AutoScrollPosition = new Point(
                    -panel1.AutoScrollPosition.X - pos.X,
                    -panel1.AutoScrollPosition.Y - pos.Y);
            }
        }
    }
}
PictureBoxは、デフォルトで非同期でイメージを読み込みますが
これを同期的に読み込みたい場合
WaitOnLoadプロパティーにtrueを設定します。
// イメージが同期的に読み込まれるか否かを決定する。初期値:false
pictureBox1.WaitOnLoad = true;

// イメージの読み込みが完了するまで待ちます
pictureBox1.ImageLocation = @"c:\sample.png";
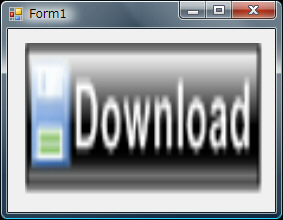
PictureBoxにイメージを表示するサンプルです。
Imageプロパティーに表示したいイメージを設定します。
或いは単純に
ImageLocationプロパティーに画像ファイルのファイル名を設定しても良いです。
SizeModeプロパティーによって
PictureBox上にどのようにイメージが表示されるかが決定されます。
PictureBoxSizeMode.AutoSize;        // PictureBoxはイメージと同じ大きさに
PictureBoxSizeMode.CenterImage;     // 中央に表示。はみ出した部分はClipされます
PictureBoxSizeMode.Normal;          // 左上に表示
PictureBoxSizeMode.StretchImage;    // PictureBoxのサイズに引き伸ばされます
PictureBoxSizeMode.Zoom;            // サイズ比率を保持したまま拡大縮小されます
using System;
using System.Collections.Generic;
using System.ComponentModel;
using System.Data;
using System.Drawing;
using System.Text;
using System.Windows.Forms;

namespace WindowsFormsApplication1
{
    public partial class Form1 : Form
    {
        public Form1()
        {
            InitializeComponent();
        }

        private void Form1_Load(object sender, EventArgs e)
        {
            // PictureBoxの大きさにイメージを合わせてストレッチ表示します
            pictureBox1.SizeMode = PictureBoxSizeMode.StretchImage;

            // 表示するイメージを設定
            Bitmap bmp = new Bitmap(@"c:\hp\image\download.png");
            pictureBox1.Image = bmp;

            // 或いは単純にファイル名を指定してもOK
            pictureBox1.ImageLocation = @"C:\sample.jpg";
        }
    }
}
PerformanceCounterを使ってNetwork帯域使用量を取得する例です。
FormにLabelとTimerコントロールを配置し
100ミリ秒毎に表示しています。
InstanceNameにネットワークデバイス名を設定する点に注意です。
デバイス名はDOSコマンドのipconfig/allなどで取得できますが
プログラムでこれを取得する方法は追々別節で説明する予定です。
using System;
using System.Collections.Generic;
using System.ComponentModel;
using System.Data;
using System.Drawing;
using System.Text;
using System.Windows.Forms;

namespace WindowsFormsApplication1
{
    public partial class Form1 : Form
    {
        System.Diagnostics.PerformanceCounter pc = new System.Diagnostics.PerformanceCounter();

        public Form1()
        {
            InitializeComponent();
        }

        private void Form1_Load(object sender, EventArgs e)
        {
            pc.CategoryName = "Network Interface";
            pc.CounterName = "Bytes Total/sec";
            pc.InstanceName = "NVIDIA nForce Networking Controller";

            // 100ミリ秒間隔でタイマー設定
            timer1.Tick += new EventHandler(timer1_Tick);
            timer1.Interval = 100;
            timer1.Enabled = true;
        }

        void timer1_Tick(object sender, EventArgs e)
        {
            label1.Text = pc.NextValue().ToString() + "Byte Total/sec";
        }
    }
}
PerformanceCounterを使ってCPU使用率を取得する例です。
FormにLabelとTimerコントロールを配置し
100ミリ秒毎に表示しています。
using System;
using System.Collections.Generic;
using System.ComponentModel;
using System.Data;
using System.Drawing;
using System.Text;
using System.Windows.Forms;

namespace WindowsFormsApplication1
{
    public partial class Form1 : Form
    {
        System.Diagnostics.PerformanceCounter pc = new System.Diagnostics.PerformanceCounter();

        public Form1()
        {
            InitializeComponent();
        }

        private void Form1_Load(object sender, EventArgs e)
        {
            pc.CategoryName = "Processor";
            pc.CounterName = "% Processor Time";
            pc.InstanceName = "_Total";

            // 100ミリ秒間隔でタイマー設定
            timer1.Tick += new EventHandler(timer1_Tick);
            timer1.Interval = 100;
            timer1.Enabled = true;
        }

        void timer1_Tick(object sender, EventArgs e)
        {
            label1.Text = string.Format("{0:P2}", pc.NextValue() / 100F);
        }
    }
}
PerformanceCounterを使って空きメモリ情報を取得する例です。
FormにLabelとTimerコントロールを配置し
100ミリ秒毎に空きメモリ情報を表示しています。
using System;
using System.Collections.Generic;
using System.ComponentModel;
using System.Data;
using System.Drawing;
using System.Text;
using System.Windows.Forms;

namespace WindowsFormsApplication1
{
    public partial class Form1 : Form
    {
        System.Diagnostics.PerformanceCounter pc = new System.Diagnostics.PerformanceCounter();

        public Form1()
        {
            InitializeComponent();
        }

        private void Form1_Load(object sender, EventArgs e)
        {
            // カテゴリはメモリー
            pc.CategoryName = "memory";

            // 物理空き容量を取得
            pc.CounterName = "Available MBytes";

            // 対象はローカルPC
            pc.MachineName = ".";

            // 100ミリ秒間隔でタイマー設定
            timer1.Tick += new EventHandler(timer1_Tick);
            timer1.Interval = 100;
            timer1.Enabled = true;
        }

        void timer1_Tick(object sender, EventArgs e)
        {
            label1.Text = pc.NextValue() + "MB";
        }
    }
}
パネルは1枚の板です。
主な使い方とそのメリットですが
1.パネル上のコントロールをまとめてEnable、Disableにできる
2.コントロールをまとめて移動させたい時にその下のパネルを動かすだけで良い
3.GroupBoxの代替
などがあると思います。
例ではAutoScrollプロパティーをtrueに設定し、
パネルが隠れると自動でスクロールバーが表示されます。
using System;
using System.Collections.Generic;
using System.ComponentModel;
using System.Data;
using System.Drawing;
using System.Text;
using System.Windows.Forms;

namespace WindowsFormsApplication1
{
    public partial class Form1 : Form
    {
        public Form1()
        {
            InitializeComponent();
        }

        private void Form1_Load(object sender, EventArgs e)
        {
            // パネルをフォームいっぱいに配置
            panel1.Dock = DockStyle.Fill;

            // わかりやすいようにPanelの背景色を設定
            panel1.BackColor = Color.DarkGray;

            // パネルが隠れたら自動的にスクロールバーを表示
            panel1.AutoScroll = true;
        }
    }
}